Pages

Showing posts with label Autumn. Show all posts

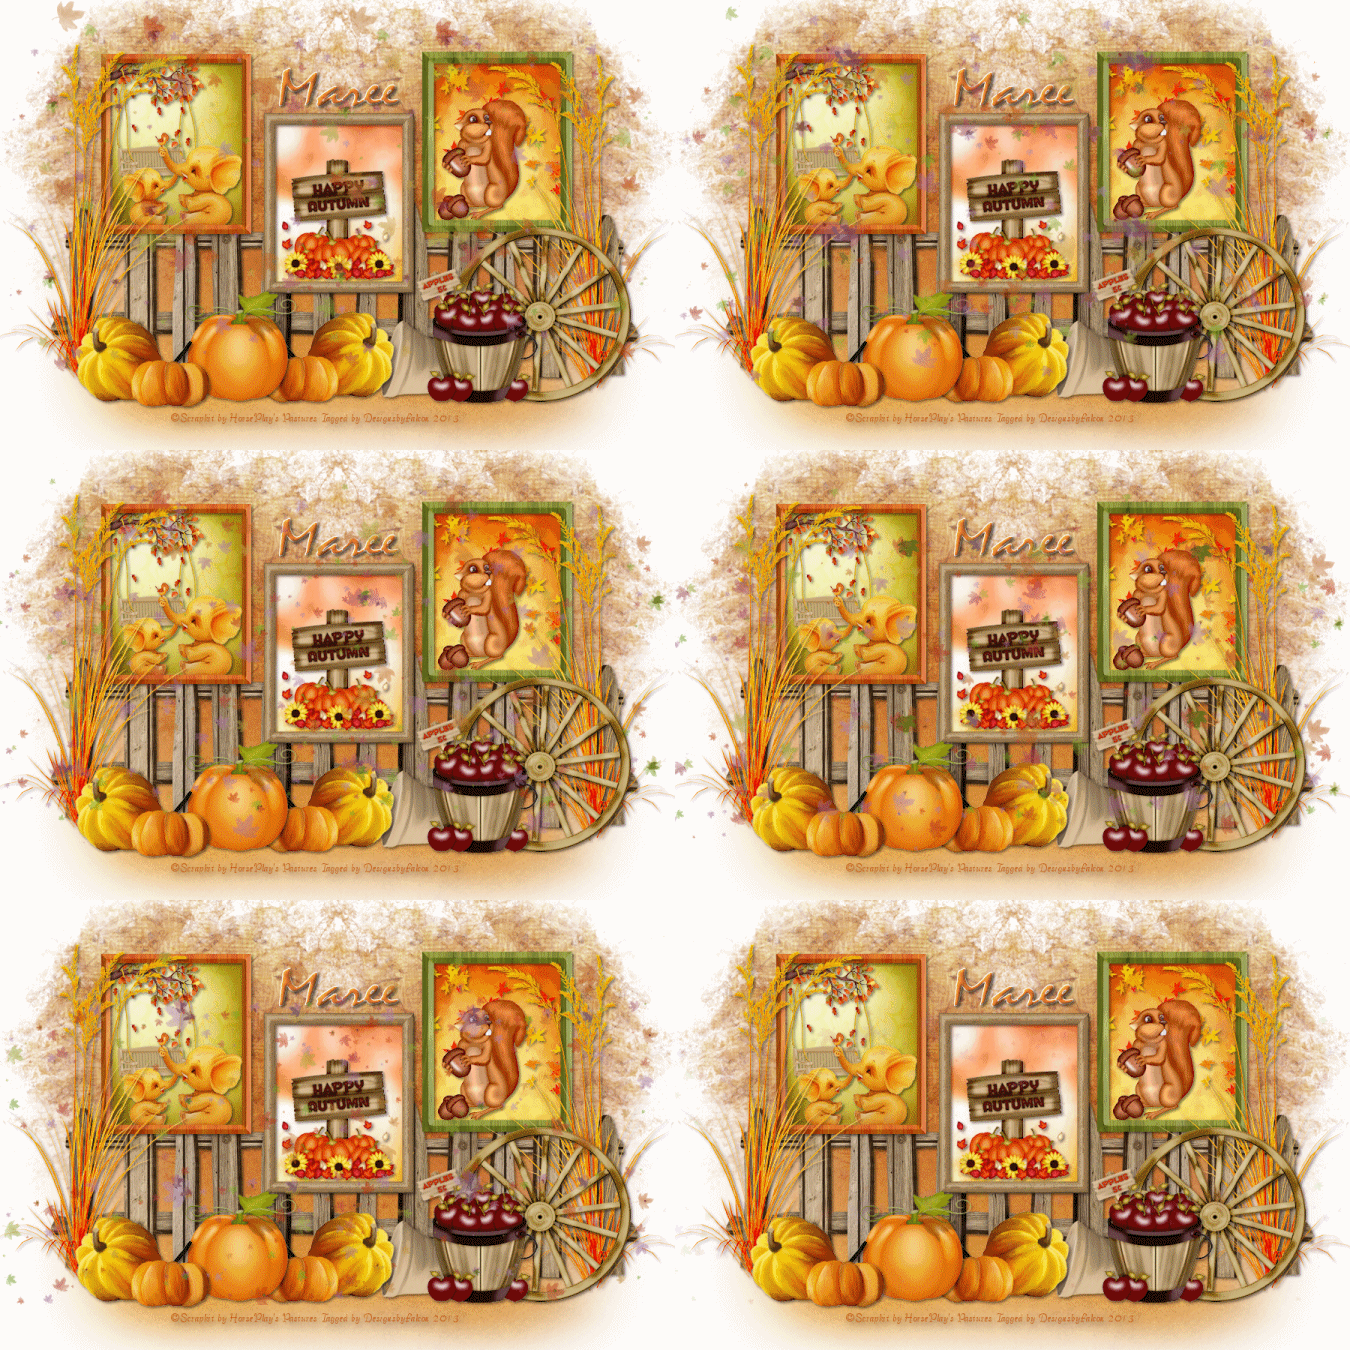
Colours of Autumn ♥


Written on    using PSP X5 - any resemblance to another is coincidental.
This was written for those with a working knowledge of PSP


Supplies needed

Autumn Sunset created by HorsePlays Pastures
You can find  this beautiful kit Here


Mask of Choice.

Font of choice

Animation Here

New transparent raster layer700 x 500.

You can resize or crop later.

Select frames hpd_ASEl28.30,31 c/p all resize 40 percent then align to your liking.

With Magic wand click inside first frame Selections Modify Expand by 5.
New layer open hpd_AS_P8 c/p into selection deselect drag below frame.
Repeat with frame 2 I used hpd_AS_P1 and for frame 3 I used phd_AS_P9.

I chose to use these elements in frame 1 hpd_AS_El & hpd_AS_El22.
Frame 2 hps_AS_El40 and frame 3 hpd_AS_El52, give all a drop shadow arrange to your liking.

Select hpd_AS_El20 c/p above background layer then resize 65%, duplicate align,then Merge down 

add a drop shadow.
Select hpd_AS_El80 c/p above fence layer resize 80% duplicate Image Mirror add drop shadow.
Select hpd_AS_El13 c/p resize 50% duplicate see tag for placement add drop shadow.
Select hpd_AS_El14 c/p resize 75% place between the other pumkins add drop shadow.
Select hpd_AS_El21 c/p resize 45% arrange next to pumkin in center then add drop shadow.
Select hpd_AS_El49 c/p resize 75% drag to right of layer add drop shadow.
Select hpd_AS_El37 c/p resize 80% move to left of wheel add drop shadow.
On background layer select all c/p hpd_AS_El78 into selection deselect apply your mask 

Add your Artist © license and your name merge.

Animation.
Open animation shop select your animation check how many frames in animation then minimise.
In PSP copy merged paste as new animation.Using Ctr+L to add the required frames.
Select animation select all copy then paste on merge copy near top or where you would like to 

place it.
Check your animation then save. 

Thanks for stopping by, I hope you enjoyed it.


An Antique Autumn


This tutorial was written and created by me on 9th January 2014
For those with a working knowledge of PSP


Supplies needed 

Created by using PSP X5 - any resemblance to another is coincidental.

I am using the fantastic artwork of ©Alena Lazareva with a valid license
Please go to UYA to purchase tube/s and license.

Scrapkit is Antique Autumn created by Tasha's Playground
You can purchase this beautiful kit Here
Mask of choice
Font of choice

New transparent raster layer 700 x 700.
You can resize or crop later.
Add drop shadow to all as you go.


Change your foreground color to #ca8502 flood fill background layer then apply 
Alien skin Splat-Edges.


Wheel 80% Flip Horizontal move to left
Branch3 76% move to left
Frame4 80% selections modify-expand by 6 -new layer
c/p Image AL0001Autumn  then deselect-merge down
C/P main tube
Leaf scatter 65%
Books 65%
Candle 80%
Leaves 85%
Please add any other elements you wish too.

Add your name and tube © and save as png.

Thanks for stopping by,this is only a guide feel free to add more elements.
I hope you enjoyed it. Would love to see your creations.


Autumn Colors*


This was written with the use of PSP X3. 
You may recreate it any version of PSP.

PTU Harvest Potpurri created by BLT Dezignz.
You can purchase at Scrappindollars .

Artwork of © Jennifer Jasenko
Currently available at CDO   .
You will need a lisence to use this artwork. 

Font of choice or the one I used Vivalid 

Mask_11 by HorsePlays Pastures Here.
Check on the left for Masks

New transparent raster layer 800 x 800.

You can resize or crop later.


Select BLT_Autumn_Bow1 copy paste as new layer.
Click inside with Magic wand add a new raster layer.
Select BLT_Autumn_PP6 copy paste into Selection.

Open your tube of choice then copy paste into selection,deselect.
Add a light drop shadow to your tube.

Select BLT_Autumn_Frame3 copy paste.
Move over the bow then resize to fit.

Select BLT_Autumn_Butterflies copy paste.
Image Mirror then resize to fit.

Select BLT_Autumn_Cluster2 copy paste.
Move to bottom of layer resize to fit.

Select BLT_Autumn_Squirrel1 copy paste.
Move to bottom of layer resize then 
drag to right of layer.

Select BLT_Autumn_Wordart2 copy paste.
Move to top left of bow resize to fit.

Select BLT_Autumn_Candles copy paste.
Move to left of layer resize.


Onbackground layer selections select all.
Select BLT_Autumn_PP3 copy paste into selection, deselectp.
Apply your mask merge group.


Add your Artist © and your name then crop or resize.

Thank you for trying my tutorial, I hope you enjoyed it.
I'd love to see your results so that I can show them on my Blog.

Tutorial by © Maree *(DesignsbyFalcon) November 2012.


Special Harvest *


This was written with the use of PSP X3.
You may recreate it any version of PSP.


Scrap Harvest Special created by Wicked Creationz Scraps .You can find it Here

I'm using the artwork of © Arthur Crowe Currently available Here
You will need a license to use this artwork.

Font of choice or the one I used Machia

Mask of Choice

Open  new image 600 x 600 transparent background.

Open WCS-HS-ELEMENT22 copy paste as new layer resize 45 percent drag over to right of layer.
Open WCS-HS-ELEMENT10 copy paste as new layer resize 85 percent move to right of layer then

duplicate give a drop shadow to both.
Open your tube copy paste as new layer resize as needed then move to right of layer add a drop

shadow.
Open WCS-HS-ELEMENT7 copy paste as new layer move to left of layer add drop shadow.
Open WCS-HS-ELEMENT12 copy paste as new layer brag down to bottom of tube 
duplicate Image-Mirror add drop shadow to both.
Open WCS-HS-ELEMENT4 copy paste as new layer resize 75 percent move to left of layer
 then add a drop shadow.
Open WCS-HS-ELEMENT2 copy paste as new layer resize 30 percent move
 down in front of last element, add drop shadow.
Open WCS-HS-ELEMENT23 copy paste as new layer arrange at top of layer, add drop shadow.
Open WCS-HS-ELEMENT11 copy paste as new layer resize 65 percent move to 
bottom right of layer add drop shadow.
On background layer select all copy and paste into selection WCS-HS_PP8 
deselect then apply mask merge group.

Add your Artist © and your name then crop.

Thank you for trying my tutorial, I hope you enjoyed it.
I'd love to see your results so that I can show them on my Blog.

Tutorial by © Maree *(DesignsbyFalcon) October 2012.


Trick or Treat


My Tutorials are strictly my own creations,
if they resemble another it is purely coincidence.
This was written with the use of PSP X5.
You may recreate it any version of PSP.

Supplies Needed.

Scrap Little Pumpkins created by SleeknSassy Designz .You can find it Here.

Font of choice

Mask wsl_84 by Weescotslass Here

Template Fall02DBM by Dzines by Melz Here.

Open the template then delete the © layer and the Wordart layer.
Click on Layer 2 Select All Float DeFloat. Open LP_Paper7 copy paste into selection.
Deselect then delete the original layer.
Click on Layer4 Copy, Select All Float DeFloat. Open LP_Paper6 copy paste into selection.
 Deselect again delete the orignal layer.Repeat this for Layer4Copy2.
Open LP_Element7 copy paste as new layer resize 85 percent arrange on Layer2-circle.
Open LP_Element8 copy paste as new layer resize 30 percent add drop shadow then duplicate.
Arrange on layer see tag.
Open LP_Element3 copy paste as new layer resize 32 percent arrange on top of layer add a drop shadow.
Open LP_Element26 copy paste as new layer resize 45 percent arrange on right of layer add drop shadow.
Open LP_Element23 copy paste as new layer resize 45 percent arrange on left of layer add drop shadow.
Open LP_Element28 copy paste as new layer resize 50 percent arrange on bottom of layer, then add Eye Candy-Impact-Gradient glow color #000000 then add a drop shadow.
Reposition the pumpkins supplied with template see tag.
New layer select all copy paste LP_Paper3 apply mask Merge group.
Add your Artist © and your name then crop.

Thank you for trying my tutorial, I hope you enjoyed it.
I'd love to se your results so that I can show them on my Blog.

Tutorial by © Maree *(DesignsbyFalcon) October 2012.


Autumn's Bounty *


My Tutorials are strictly my own creations, 
if they resemble another it is purely coincidence. 
This was written with the use of PSP X5. 
You may recreate it any version of PSP.

Supplies Needed.

Scrap Almost Autumn created by SleeknSassy Designz .You can find it Here.

I'm using the artwork of ©Anna Marine Currently available at CDO
You will need a lisence to use this artwork. 

Font of choice 

Template by Melissaz Creationz   Here.

Mask wsl_81 by Weescotslass Here. 

Open the Template and delete the © layer.
Select Raster 5 then select all Float DeFloat.
Open AF_Paper5 resize 40 percent then Edit copy paste as new layer above raster 2 layer.
Selections Invert tap Delete then delete the original layer.
Repeat for the other leave layers I used AF_Paper2 and 4.
On the duplicated leave layer at bottom right I have added 
Select raster 5 select all Float DeFloat open AF_Paper1 copy paste as new layer.
Selections Invert then tap Delete.Delete the original layer.
Click on grey Merged layer Select all Float DeFloat open AF_Paper7, 
Edit Paste into Selection then Deselect.
On Black merged layer repeat as above using AF_Paper8.
On the two strips merged layer repeat again this time using  AF_Paper6.
On Raster 6 repeat again this time I used  AF_Paper10.
Open AF_Element3 copy paste as new layer resize 75 percent Image Mirror, 
then drag to right of layer,lower Opacity to 89 then add a drop shadow.
Open AF_Element9 copy paste as new layer resize 30 percent move to left of layer 
near banner. Add a drop shadow.
Open AF_Element8 copy paste as new layer resize 35 percent move to
 right of layer add drop shadow.
Open AF_Element21 copy paste as new layer resize 75 percent repeat then 
move to left of layer, add a droop shadow.
Open AF_Element4 copy paste as new layer resize 65 percent drag to top leaves
 on left add drop shadow.
Add your tube of choice or the tube I used move to center then add a drop shadow.
Open AF_Element54 copy paste as new layer drag to near the bottom see tag.
Open AF_Element49 copy paste as new layer resize 65 percent then arrange at top of layer.

I add a Gradient Glow to this using color #f8dfc2 then add a light drop shadow.

New layer select all open AF_Paper10 copy paste into selection then apply mask, Merge group.

Add your Artist © and your name then crop.

Thank you for trying my tutorial, I hope you enjoyed it.
I'd love to se your results so that I can show them on my Blog.

Tutorial by © Maree *(DesignsbyFalcon) October 2012.


Every Morning *


My Tutorials are strictly my own creations, 
if they resemble another it is purely coincidence. 
This was written with the use of PSP X3. 
You may create it any version of PSP.

Supplies Needed.

Scrap Every Morning created by Sweet Cravings Scraps .You can find it Here.

I'm using the artwork of ©PinUpToons Currently available at CDO.
You may choose to use the same tube that I have used or any other tube of choice.

Font of choice 

Mask wsl_343 by Weescotslass Here.

Open new image 650 x 650 transparent background.
Open SCS_EveryMorning_Frame9 copy paste as new layer. Resize by 75 percent,
 add drop shadow.
lick inside frame with Magic wand, Selections-Modify-Expand by 5. Create new layer.
Open SCS_EveryMorning_Paper2 copy paste into selection on new layer.
Deselect drag below frame layer.
Open SCS_EveryMorning_Flare2 copy paste as new layer below paper layer drag up to
 top left of frame resize 85 percent then duplicate Image Mirror.Add a drop shadow.
Open your tube copy paste as new layer.
Open SCS_EveryMorning_Bags copy paste as new layer resize by 65 percent drag to left of frame
. Add drop shadow.
Open SCS_EveryMorning_Chello copy paste as new layer resize by 69 percent.
Image FreeRotate 38 left.
Open SCS_EveryMorning_Leaves copy paste as new layer resize 65 percent arrange at 
bottom of frame then duplicate.Add drop shadow.
Open SCS_EveryMorning_CuteBear copy paste as new layer arrange on  right of frame
 resize 65 percent.Add drop shadow.
Open SCS_EveryMorning_Hat copy paste as new layer resize 65 percent arrange 
on top of CuteBear. Add a drop shadow.
Open SCS_EveryMorning_Balloon copy paste as new layer resize 60 percent arrange 
next to cutebear, see tag.
New layer Layers Arrange send to bottom Select all.
Open SCS_EveryMorning_Paper4 copy paste into selection apply mask Merge group..

Add your Artist © and your name then crop.

Thank you for trying my tutorial, I hope you enjoyed it.
I'd love to see your results so that I can show them on my Blog.

Tutorial by © Maree *(DesignsbyFalcon) October 2012.